How Do You Start Laying Herringbone Floors?
Every homeowner wants beautiful floors that exude elegance and timeless luxury. However, very few floor design patterns can do that without costing a fortune. Fortunately, the herringbone pattern is one of the select few. But, its installation can be tricky for DIYers. As a result, most people get stuck when deciding the best way to lay the herringbone pattern in their apartments.
Of course, it’s always more advisable to let a professional fitter lay your herringbone flooring. But you probably don’t want to do that. You have the financial implications of hiring specialists and your pride as an acclaimed DIY king/queen to consider. Plus, the expert may not be able to install the herringbone floor in a manner that’ll satisfy you, so you’d rather do it yourself.
Whatever your reasons are, two things are certain; you want a herringbone pattern on your floors, and you want to put it there yourself. So, we’re here to help you in the little way we can – and that’s by showing you how to lay herringbone flooring in your apartment. Read on if you’ll like our assistance with your exciting project.
Pre-Installation Phase
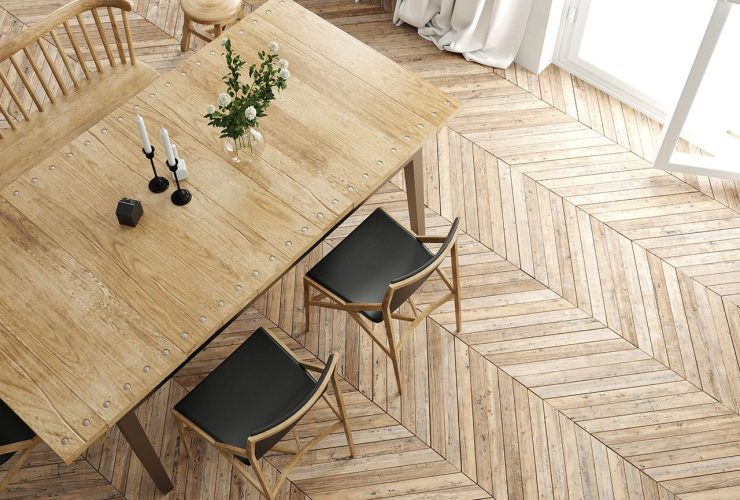
The most fundamental thing you need to know about Herringbone pattern flooring is that you’ll need to lay the planks at a 45-degree angle. So then, you’ll have two tips pointing up and down the longest lengths of the room. AS a result, the planks form an ‘L’ or ‘V’ shape when you view the layout from the side or bottom. You can use this to create a mental picture of what the herringbone pattern will look like on your floors.
Once you have a clear idea of the design you intend to create, the next thing is to draw up a plan. Also, you’ll need to take some preliminary steps to put you on a path to do a successful job. Below are some things you’ll need to take care of before you start laying the herringbone floor.
Choose the Right Materials
Herringbone floor designs are flexible, and the material options are expansive. So you get to choose the best material to create the perfect parquet for you. However, there’s a slight problem with this freedom. You may get confused when considering materials and selecting the best one for your project. People may then give you recommendations based on their tastes, and you may not like the result after completing the project.
Regardless, we recommend going with something you’ll not have any issues installing. You may also want to go all-natural. I.e., Opting for no other stains or finishes. If you’re not a fan of wood flooring, laminate may be the right option for you. Or, you can try ceramic and stone tiles. Your possibilities are limitless with the herringbone design.
Store the Boards Appropriately to Allow Full Acclimatization
If you’re going with wooden materials, whether solid or engineered, you need to let the board acclimatize. Acclimatization is a process in which wood materials change physically in reaction to the atmospheric condition in an environment. In other words, the wood planks may shrink or expand depending on the temperature, pressure and relative humidity in your apartment.
That said, letting the boards acclimatize is as simple as leaving them in the environment for two to three days. After that, the boards will undergo all necessary changes and adjust as the environment allows within the storage period.
Prepare the Subfloor
The subfloor is the ground on which you’ll lay the herringbone flooring. It’s pretty important to ensure the integrity of the subfloor before you begin installing the battens. Make sure to prepare the subfloor in a manner that is appropriate for the type of material you want to lay on it. If you intend to use wood materials for the herringbone pattern, ensure the subfloor is dry, solid and flat.
If you are using ceramic tiles, you’ll need the floor to be solid, flat and a bit rough. The same applies to stone tiles. Also, for considerations of gradients and flatness, the subfloor must not have more than a 3mm height difference over a distance of 3 metres.
Take Care of The Underfloor Heating
Turn off the underfloor heating wherever you intend to lay the herringbone flooring. The heating system may interfere with your perfectly laid out pattern and make a mess of things. So, it’s always advisable to turn it off before starting work. You can turn it back on the moment you finish installing the floor.
However, don’t take the heating system back to its normal temperature right away. Instead, gradually increase the temperature by 5 degrees every day until you get to the desired temperature level.
Account for Expansion
Accounting for expansion simply means factoring tiny spaces into your design to protect the integrity of the floor layout. Temperature changes, humidity, age, traffic etc., can cause your floor to expand. Leaving an expansion space in the design will protect the floor from buckling when such expansions occur.
The ideal expansion gap is a space of 8mm for wood flooring. But you can take it up to 10mm for areas larger than 60 square metres.
Prepare Your Tools and Supplies
You’re going to need a lot of tools and materials to lay herringbone flooring. We recommend getting the following tools in preparation for the project.
- Border flooring strip
- Straight edge
- Apron flooring strip
- Heavy-duty knife
- Square ruler
- Tape measure
- Pencil
- Chalk and chalk line tool
- Circular saw
- Jigsaw
- Protective materials
- Screws
- Nails
- Router
- Rubber mallet
These tools are not only going to make your work easier, but they’re also going to help you work more efficiently. As a result, they’ll help you avoid wasting time, effort and resources.
Related Article: Reasons Why You Need Herringbone Floors
Installing the Herringbone Pattern – Where to Start from
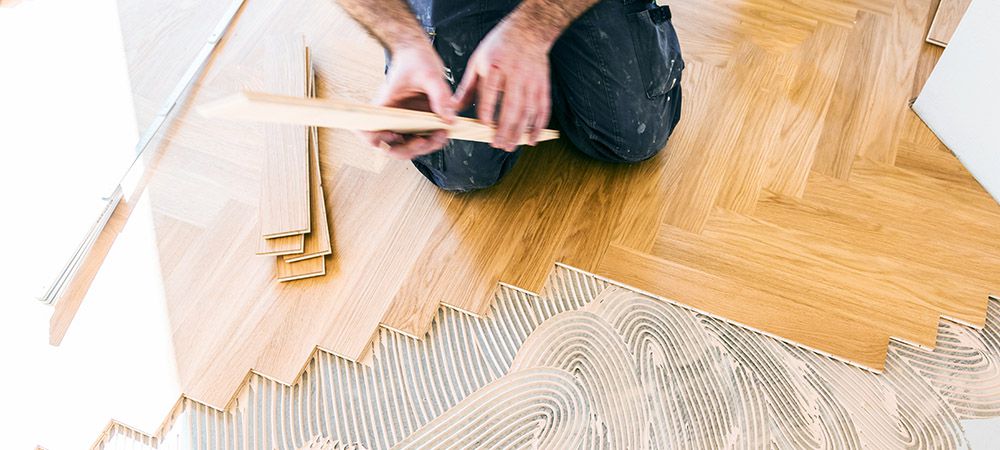
Now that you have all the materials to lay the herringbone flooring, the next step is to start the floor installation. But where exactly do you start from? What’s the best way to start laying the herringbone floors that’ll set the pace for all the subsequent activities and make your work easier? Check out the herringbone flooring guide below.
Measure the Floor
Measuring the floor is the first thing you should do right from the moment you decide to install a parquet flooring. You should already have accurate dimensions of the installation space before you buy herringbone flooring. Having accurate documents will enable you to get the appropriate volume of resources for the project.
So, we expect that you already have an exact measurement of the floor space. However, if you don’t have it yet, go ahead and get it. Ensure the measurement is accurate to the last number. Don’t use a rough estimate to execute the project; you’ll make a mess of it. Instead, use the precise dimensions to do a thorough job.
Find the Centre and Establish the Field
Once you have the precise measurement of the floor space, you can divide it according to how you want to lay the herringbone flooring. Use a tape measure to identify the centre of the room, then draw a line to cut across that centre. You can use chalk to draw the line, ensuring it extends from one end to the other end of the room.
After that, create a rectangular field which will be the framework for the herringbone flooring. Of course, the pattern won’t cover every inch of the space except you decide you want it that way. As such, you need to draw out the field and set the limits of the coverage of the pattern. However, if you want the layout to occupy every part of the floor, then you can assume the wall as the limit.
Cut the Slats for the Floor
Depending on the type of herringbone pattern you want, you may need to cut the flooring slats into smaller sizes. Then, of course, you may purchase perfectly predesigned slats that are the perfect dimension for your design. But even at that, you’ll still need to do a bit of trimming, at least. In addition, you’ll need to cut for parts adjoining to the walls or at the field boundaries.
Lay out a plan of the design you want and use rafter squares to hold the slat at 90 degrees angles in preparation for cutting. This way, you can get the optimal slat length for your design, and you can avoid mistakes when cutting. It’s best to trim the slats to a multiple of their original measurement for more accurate dimensions.
So, you need to identify the appropriate dimension then measure and cut the slat according to it. Remember to trim the tongue on the longitudinal end of the slat. After that, add grooves to the sides of the slats so they can slide securely into each other. You can create the grooves using the router. But regardless, make sure the tongues and grooves of the slats will fit together appropriately.
Create the Nailing Blank
A nailing blank will be the template you’ll use for installing your flooring. While you don’t compulsorily have to use a nailing blank, having a template will make your work faster and more accurate. The nailing blank should be a triangular cutout of the same material you’re using for the project. For accuracy, the triangle should have two angles at 45 degrees, and the length of the two sides should match the exact length of your flooring slats.
To lay the slats:
- Draw a line across the centre of the nailing blank.
- Place the blank on the floor such that its centerline falls in line with the centerline of the field.
- Screw or nail the template to the floor, then start placing the slats along the sides of the blank.
Steps to Laying the Herringbone Pattern Floors
Step 1
Lay down a piece of slat along the sides of the nailing blank and make sure it lines up perfectly. Then, place a second slat along the other side of the nailing blank. However, make the second slat overlap to meet the end of the first slat. This way, the combination of the two slats will form a V if you remove the nailing blank.
Ideally, you should have two types of boards if you’re working with wood materials for this project. The manufacturers should label the boards; A and B. The A-boards will have tongues on their sides, while the B boards will have grooves. It can be the other way round. When laying the slats, make sure the tongue of the first A slat clicks into the groove of the second B slat.
Step 2
Carefully place the next set of A and B slats in line with the first set you created. Ensure to click the boards into each other to make the design secure. You may also use an adhesive to glue the boards down. Then keep adding subsequent slats to create the entire herringbone layout. Take care to position two slats at a time until you get to the boundary of the field.
Step 3
Once you’ve laid the pattern to one border, remove the nailing blank and bring it to that boundary. Then position it such that its flat side is now parallel to that boundary, and its pointed side is opposite where you started. Then start laying the slats again. This time make sure the end of the slats overlaps with the slats you last installed. Also, make sure the slats line up neatly against the blank.
Step 4
Lay the second slat on the other side of the nailing blank, making sure it overlaps with the top side of the first one. Ensure the tongue of one slat clicks into the groove of another. Then lay down subsequent slats to create another row of the herringbone pattern on the floor.
Step 5
Repeat the same process as outlined above until you cover the significant spaces within the field you created.
Step 6
By the time you’re done laying down most of the slats, you should have some empty areas. These open spaces will be where you had placed the blank and around the boundaries of the field. You’ll have to go back and fill up the spaces.
Glue a flooring spline into the grooves of the slats you already have on the floor if they don’t have tongues. Then, lay in extra slats into the space to fill the gap. Of course, you may have to cut the slats into smaller lengths to size some of the gaps.
Step 7
Next, you’ll want to lay down the border around the herringbone flooring. If you install the pattern across the entire length and width of the room, you may not need to add the border. However, if you created a field and kept to it, you may want to add a frame around it.
Use the router to cut grooves on the outer sides of the slats nearest to the border. Do this across all the sides of the field. Then, attach flooring splines into the grooves to create tongues around the slats. Next, place a border and apron strips around the pattern, respectively, using the flooring nailer. Finally, add more slats until you get to the wall or wherever you want to stop the design.
Keep in mind that you’ll have to cut off parts of the slats that’ll be adjoining to the wall. Also, don’t forget about the expansion spaces you’ll need to leave along the wall. The ideal distance is 8mm for medium-sized rooms and 10mm for large areas.
Laying The Herringbone Pattern In Irregular Spaces
You may want to install the parquet floor in places other than the open free areas of the room. The process to fix the pattern in such places may be tricky. However, the 45 degrees angle is the best direction to lay the herringbone flooring. So, we recommend laying the slats at 45 degrees angles.
If you’re fixing for adjoining areas, we recommend keeping to a single direction. Lay the floor out in the same order as you laid the others. Also, use matching planks to avoid creating a busy look in the space. The same applies to corners. Changing the direction of the flooring may disrupt the design, and it may start looking a bit confusing after a while.
Also, laying a herringbone pattern on the stairs is not the best idea. The reason is that stairs have relatively small spaces and will take a lot of work to cut and lay the slats. So it’s not really worth the effort.
Related Article: Best Type of Wood for Scandinavian Flooring
Final Take
It takes quite a bit of effort to lay down herringbone floors. But the design will be satisfactory and the effort well worth it if you do a fine job. And to do a fine job, you need to get it right from the beginning through every stage of the installation. But you can do it with proper knowledge of how to install the herringbone flooring pattern.
That said, do you have a herringbone design in mind that you want for your apartment? If you don’t, why don’t you check out our online store at Three Trees Flooring? It’s home to the latest herringbone flooring designs. We’re sure you’ll find something fascinating there.