Top Tips For A Successful Herringbone Installation
DIY herringbone floor installation can be challenging, not to mention complicated. There are many different measurements and dimension considerations to note. You’ll probably also have to cut slats into smaller pieces and at awkward angles just to get the perfect size and shape. Plus, you’ll be doing all of those with a set of tools you’re not very familiar with.
It’ll be easier to let the professionals handle the installations, and you can take your mind off the whole process. You can let someone take care of the project for you while you focus on other activities. But if you take that route, then you’ll never learn how to do it yourself. Plus, letting someone else do the job will cost you money, even though you could pull off the herringbone installation by following a few tips and guidelines.
So why not do it yourself? Obviously, the professionals have the required training to do the job quickly and easily. However, you can also pull off a herringbone floor installation with the right tips and tools. In fact, you’ll find it quite exciting and satisfying by the time you’re through with it. So, we’re providing some tips to help you install herringbone flooring successfully without any hassles.
Prepare For the Herringbone Floor Installation
You can’t jump straight into herringbone floor installation or any project of a similar scale without adequate preparation. You’ll need to have some things in place before you can begin the actual process of laying your floors. Of course, some people will argue that you can dive right into the flooring process. Yes, you can; however, you’ll most probably waste time, energy, resources and ultimately hate the results.
That said, the pre-installation preparation primarily involves deciding the herringbone flooring design you want first. Then you can proceed to select the materials and tools you need to create the design. Let’s take a look at them in detail.
Choosing the Design
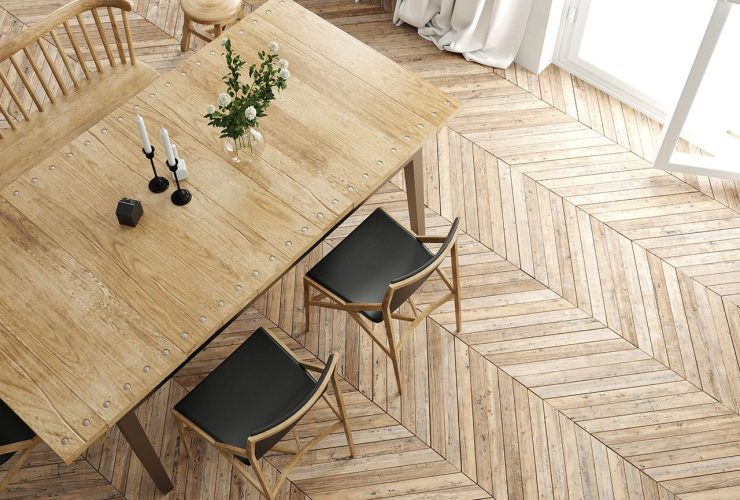
The right herringbone design in your space can impart a visual elegance that’ll perfect your interior decor theme. The zigzag pattern creates an illusion of movement and dimension, which gives the environment a more spacious visage. Safe to say, it’s a relatively cheap way of creating a sophisticated look in your space. But you can get it all wrong just by missing the mark at this point.
There are several herringbone pattern designs you can pick from. While each design adheres to the traditional zigzag pattern of herringbone layouts, each also has its uniqueness. I.e. they all have attributes differentiating them from each other. You should pay attention to these attributes to determine the best option for you.
For instance, you may want to consider a mix of traditional and modern herringbone designs. Such a combination creates a Scandinavian-esque feeling in the interiors. It adds a traditional spin to an otherwise modern setting. You can perfectly portray this idea with all white walls and ceilings on tan brown herringbone floors.
You can also try a wood mix, use knot-free wood, lay down a patterned rug, pair with eclectic decor and experiment with many other ideas. Consider your design options carefully before diving into the installation stage.
Choose the Right Flooring Material
We may have jumped the gun a bit in the previous point by assuming you’ll want to go with wood materials. Regardless, one of the sweet things about herringbone designs is their flexibility. So, you can choose any material you feel is the best for the project. You can even lay the herringbone pattern on places other than your floors.
However, if you want our recommendations, we’ll suggest using wooden materials. Most of the herringbone installation tips we have here are for wood materials. We have a particular preference for prefinished engineered hardwoods. These materials are easy to work with, and they look great even without additional finishes or stains. Solid hardwood also does exceptionally well in herringbone layouts and will stand the test of time.
Then again, you can consider options such as bamboo vinyl materials if you desire varieties. Of course, you also have the option of ceramic tiles or stone materials for your floors. However, those may be a tad difficult to work with. Plus, it’ll take more effort to lay a herringbone flooring using these materials.
Get Your Supplies and Equipment
Once you have decided on a design and materials you want to use; the next step is to get the things you need. This aspect also includes creating a plan for executing the project. You need a plan to be able to pull off the task without any hassles. And the plan must be comprehensive enough to account for all the materials you have plus the timespan for the project.
After creating your plan, you can step into the supplies shop to get the resources you need. Start by picking the materials – solid or engineered hardwood, tiles or stone slats. Pro-tip, buy a little more than you need when purchasing the materials to protect against workflow breakdown during the herringbone flooring installation.
That said, the materials you’ll use will determine the supplies you’ll need. For instance, if you’re going with hardwood floors, you will need the following tools.
- Cutting Materials – Circular saw, jigsaw, router.
- Measuring materials – Rafter squares, tape measure
- Marking tools – Chalk line tool, pencils
- Fasteners – Flooring nailer, nails, rubber mallet, adhesive, screws.
- Others – Painter’s tape, flooring splines, apron flooring strips, border flooring strips, spare ¾ inch plywood.
If you intend to use ceramic tiles or stone slats for your floors, you’ll need some or all of the following;
- Manual tile cutter – for marking and cutting tiles
- Notched trowel – for spreading adhesive over the subfloor
- Tile spacers – for creating spaces between the tile columns and rows.
- Tile trim – for smoothening the raw edges of the tiles
- Grout – for filling the spaces and joints
- Grout float – for applying the grout
- Sponge – for cleaning out excess grout residue and removing grout spills
- Silicone Sealant – to seal spots between adjoining surfaces and edges
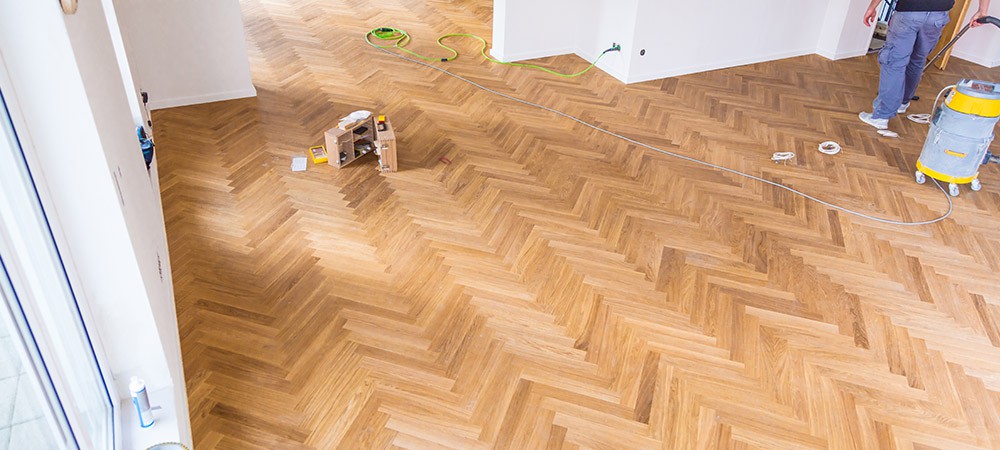
Prepare the Subfloor
Nobody should have to tell you to prepare the subfloor before laying the herringbone flooring on it. But we’re doing it anyway since it’s an essential tip to ensure a successful herringbone floor installation. Then again, most of the ideas we’ll be giving in this herringbone floor installation guide will be useless if you miss such an obvious step.
That said, the subfloor needs to be in top condition to provide long-lasting support for your herringbone floor. Part of being in good shape involves it being smooth and level. A level subfloor will make your job easier when you start laying out the pattern. Next, ascertain the moisture content of the subfloor. Make sure it’s not more than 5%.
Then again, your subfloor can be either timber or concrete. You’ll typically find concrete subfloors in most modern apartments. So, you’re more likely to work on a concrete subfloor. Regardless, let’s look at both subfloor types in detail.
TImber Subfloor
People often use timber subfloors to replace floorboards that are no longer in good condition. I.e. most timber subfloors originally had floorboards; that’s why they’re not very popular.
That said, you may have floorboards in your apartment, and you can work with them. However, if you notice they’re not in the proper condition to support the herringbone floor, you should replace them with solid plywoods. Plywoods will provide a stable foundation for the herringbone flooring.
Concrete Subfloor
Concrete subfloors are the more popular options you’ll find in most contemporary homes. That said, if you have a concrete subfloor in your apartment, you first need to ensure it’s free of bitumen residue. If its gradient is uneven, you may want to use a self-levelling compound on the floor.
Also, make sure the floor’s moisture content doesn’t exceed 35% R.H when using the self-levelling compound. You should use a liquid damp proof membrane to reduce excess moisture on the floor. Plus, the LDMP will also reinforce the structure of the herringbone floor with the subfloor when you lay it.
Decide the Herringbone Floor Installation Method(s) You want to Use
There are numerous ways to install a herringbone floor, but we won’t say any is the best. Your choice of method will primarily depend on the materials you have available and the type of herringbone pattern you want to create.
That said, if you’re still new to DIY herringbone floor installation, you should consider using the click method. It’s best to leave the other methods for the professionals. Let’s consider the different techniques you can use in detail.
The Click Method
This method of herringbone flooring installation is the most straightforward; you don’t even need professional tips to pull it off. It’s as simple as fitting slats together like jigsaw puzzles. You only need to push the tongue of one slat into the groove of another while following the herringbone pattern. It’s that easy.
The Glue Down Method
Professional installers often employ the glue-down method. And, you’ll need more than a few tips to pull off a herringbone floor installation using this method. That said, you first need to pick a glue that’s compatible with both the wood and the subfloor. The wrong glue won’t work efficiently.
Then, you need to ascertain the moisture content of the subfloor before applying the glue to it. The moisture level can affect the effectiveness of the adhesive. It must be below 9% for the glue to remain potent. You’ll need to use a moisture barrier if the content is above the mark.
Finally, you need to get the consistency of the glue right. It shouldn’t be too mild or too thick. Too soft will not hold well, and too thick will cause uneven pressure distribution across the board.
The Nailing Method
This method involves nailing the slats to the subfloor, just as its name implies. Needless to say, your subfloor and flooring must be compatible with nails for you to use it. In other words, the nailing method is more suitable if you’re using wood materials and you have a subfloor of plywood, timber or battens.
You can still use the method if your apartment has a concrete subfloor. However, you’ll need to use additional components to make it work. For instance, you’ll need to first lay down a 4mm plywood on the concrete before installing the hardwood. You may also need to use foam underlay to prevent squeaking noise.
Nonetheless, you want to use a nail gun for this method. You should take care to insert the nail at an angle of 45 degrees to the centre of the board. Also, ensure to keep a consistent pace between the nails, don’t insert them too close to each other. And be cautious while working; any mistake can damage the hardwood, subfloor or both.
The Screwing Method
This method is pretty much the same as the nailing method. The only difference is you’ll be using screws in this case. The whole point of this method is the advantage screws have over nails. And that you stand a lower risk of splintering the slats when using screws.
You can proceed to install the herringbone floors once you’ve run through the activities discussed above. That said, let’s consider tips for making the herringbone floor installation process easier.
Related Article: How Do You Start Laying Herringbone Floors?
Tips For Herringbone Flooring Installation.
We won’t go into the details of how to install herringbone flooring, but the following tips will help you pull off a herringbone flooring installation like a pro. Read on to discover simple actions that improve your accuracy, speed and design with parquet layouts.
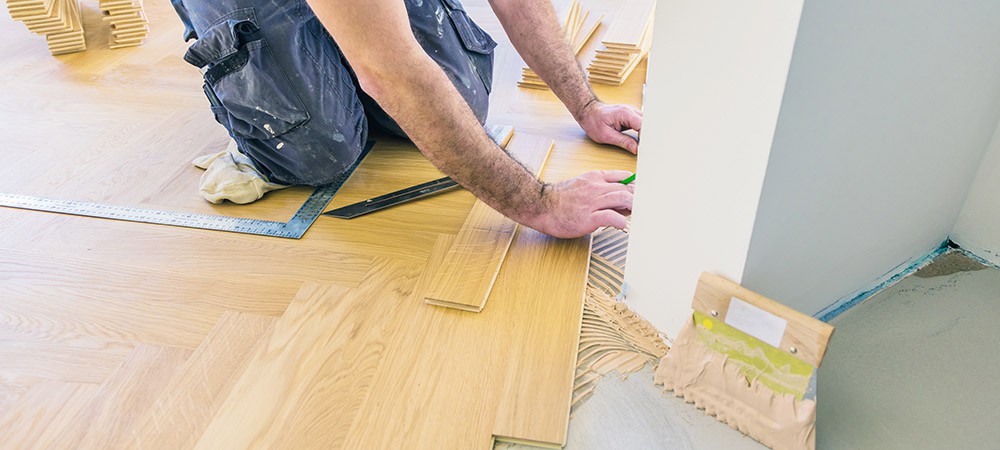
Measure The Area and Mark Your Point
The idea of marking out the points for the pattern may sound tedious, but it’s worth implementing. It’s also essential for determining the direction to lay the herringbone pattern. So, to complete this task, you should first establish your area. I.e., determine the section of the floor that the herringbone pattern will take and mark it out. Next, find the centre and draw a line to cut across the middle of the area.
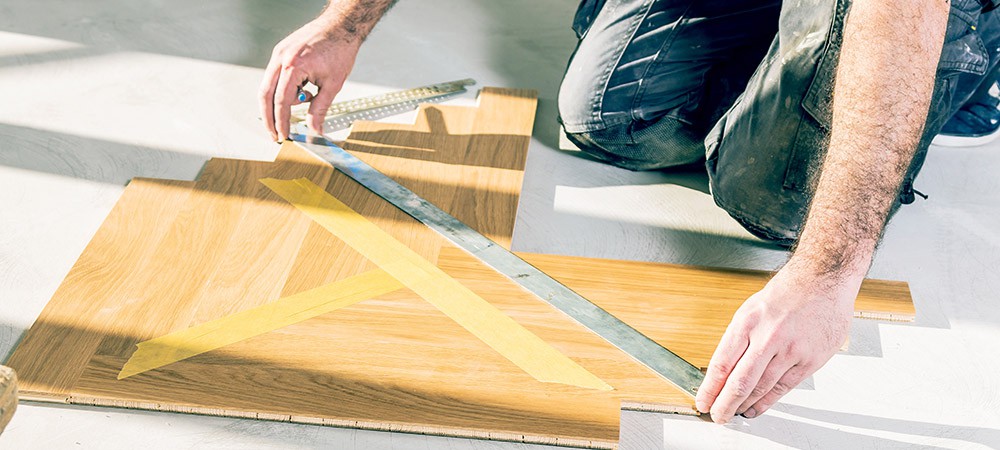
Only Cut A Handful of Slats at a Time
It makes perfect sense to want to cut up all the slats before you start the work. However, we’ll advise against doing that. You may make a mistake while measuring the dimensions of the slats. If you cut up all the slats according to the wrong measurements, you’ll encounter problems down the line. Then, you’ll have a bunch of useless slats with you, or you’ll have to make do with the wrongly cut slats, which may not give you the result you desired.
However, if you only cut up a bunch at a time, it’ll be easier to rectify errors when they happen. For example, you can easily forgo the few slats that you cut to the wrong size. Or, you can repurpose them for other parts of the project.
Use a Nailing Blank
A nailing blank is a piece of 3/4 inch plywood cut into a triangle shape. The nailing blank will be your template for laying down the slats. When creating the nailing blank, ensure two of its sides are the same length as your flooring slats. Also, make sure they’re at an angle of 45 degrees.
A nailing blank increases your accuracy while eliminating the need to mark points for every slat you want to put down. Instead, you’ll only need to draw a line from the tip of the triangle to cut across its centre. Then align the line on the blank with the centerline of the area. With that arrangement in place, you can start putting down the slats along the sides of the blank.
Make the Slats Overlap
The main difference between the herringbone and the chevron pattern is that the slats in herringbone designs overlap. The battens meet at the end to form a perfect V in chevron patterns—however, the ends of the slats in a herringbone layout overlap.
So, to make the perfect herringbone flooring pattern, make sure the ends of the slats overlap. A way to make sure you’re doing the right thing is to view the design diagonally. The battens should form an L shape on the floor when looking at the pattern sideways.
Related Article: Reasons Why You Need Herringbone Floors
Final Thoughts
Above are some of the tips you need to pull off a successful herringbone floor installation. Once you’re through with applying these steps, step back and admire your work. Not only will you have a beautiful new floor, but you’ll also be adding a touch of elegance to your interior decor. If you’re having doubts, call in the professionals and let them take care of the project for you.
Here at Three Trees Flooring, you’ll find various herringbone flooring designs that are easy on the eye and easier to install. Look through our online store for the best herringbone flooring designs available in Ontario.